When you take some cool videos with your flip cameras and you want to share flip video with other people online, you will need to upload flip video to web. The Flipshare software offers the solution to direct uploading flip video to YouTube and other websites; however, you will have to live with the size limit and the lack of customization of your videos. How about uploading flip videos to your own website with any quality and flexible customization to share them with your customers, friends and Family? Part One: Convert flip video to Flash on Mac Flash files are widely used by most major video sharing sites because Flash files are of high compression yet small sizes with high quality and easy streaming. If you have your own website, you can freely and perfectly share your flip videos with any video quality and highly customizable Flash player skins etc. Flip videos are usually in MP4 or AVI format, therefore, to share flip video on your own website, you need to convert flip video to Flash and then upload. To do this, you can download Doremisoft Mac Video to Flash Converter and convert flip video to Flash on Mac by the following easy steps: 1.Add flip video files Click on the "Add File" button to add your flip videos to this program. Part Two: Upload flip video to Web After the conversion, you can click on "Find target" on the bottom of the main interface to locate the converted files. When you open the folder, you will find multiple folders, each folder contains the contents of one converted flip video. For example, if a video is named "family-video", you will find a folder named "family-video-xxx..", open this folder and you can see the following files in it: AC_RunActiveContent.js, family-video.flv, family-video.html, family-video.jpg and family-video.swf.
Convert flip video and insert flip video to PowerPoint with doremisoft flip converter. Many users might use Flip video camcorders to record video clips and insert flip video to PowerPoint presentations. But flip videos cannot be directly inserted to PowerPoint. The newest version of PowerPoint – PowerPoint 2007 supports avi, asf, mpeg and WMV and flip videos are usually in mp4 and avi, however, the avi files directly taken by flip video cameras cannot usually be inserted to PowerPoint. Why, you may wonder, are the avi files from flip video cameras not supported by PowerPoint 2007 since PowerPoint does support avi? The actual cause of this problem is that PowerPoint uses MCI player, and to insert videos to PowerPoint, the video files must have the correct extension AND the codec compatible with MCI player. The best way to insert flip video to PowerPoint is to convert flip video to PowerPoint supported wmv, which is an easy job for Doremisoft Flip Video Converter. If you are running Mac OS, download the Mac version here. If you are running Windows OS, download the Windows version here. Taking the Mac version as an example, you can convert flip to PowerPoint by the following easy steps: Step 1: Add flip video Click on the “Add File” button to import your flip videos to the application. Step 2: Select the wmv format Click on the Profile drop-down list, go to “Common Video”, scroll down to the very bottom of the Common Video list, and you will see WMV Video, click on it to select. Step 3: Start conversion Click on the “Start” button to start the conversion. After the conversion, the folder where the converted files are saved will pop up and you will find the wmv files of your flip video clips right in the popped up folder. You can now insert the converted files to your PowerPoint presentation by the following steps: Step 1: Copy and paste the converted videos to the same folder where your PowerPoint presentation is saved. Step 2: Open your presentation, go to the slide where you want to place your video, and click on the Insert tab on the upper left. Step 3: From the Insert tab, find “Movies and Sounds” on the right part, and then click on “Movie from File”. Step 4: Select the converted video you want to insert from the same folder and click OK. Step 5: You may want to resize your video if it takes up too much space of the slide. We recommend that you do the resizing by dragging the corner handles to avoid distortion. Step 6: Now you will see a message asking how you want the movie to start in the slide show. And you can choose to automatically play the inserted video or play it on a click. And now, you can enjoy your work and play your presentation and view the inserted video!
SAN FRANCISCO: Google Inc. on Monday said users visiting Google.cn are now being redirected to Google.com.hk.
The US Internet company said in a blog posting that it intends to continue R&D work in China and also to maintain a sales presence there. More information about it.
 Doremisoft Flip Converter is an excellent flip camcorder converter to convert flip to iPhone, iPad, iPod, PSP, Apple TV etc., convert flip HD and flip video to mp4, avi, 3gp, 3g2, mpeg1, mpeg2, mpeg4, mpg, flv, swf, wmv, dv, mov, m4v, mkv etc. with easy flip video editing functions and high output quality. This flip converter is the perfect flip video software for all Flip series including Flip Ultra, Flip Ultra HD, Flip Mino, and Flip Mino HD. With this flip camcorder converter, you can even extract audio from Flip video and save the extracted audio as mp3, aac, ac3, wav, etc. Doremisoft Flip converter is also an easy flip video editing software that offers flexible yet easy functions to edit flip videos. It can crop flip video, trim flip video, adjust video brightness, contract and saturation, merge flip videos into one file and capture snapshots from flip videos.
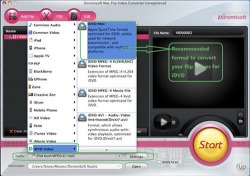 Burn flip to DVD by converting flip video to iDVD supported video formats. Import flip to iDVD and burn flip video to iDVD. Flip video cameras have made is super easy to take videos, and many flip video camera users tend to have a big amount of flip videos taken on different occasions. One good way to store and archive flip videos is to burn flip to DVDs. However, flip videos cannot seem to be imported to iDVD directly. iDVD is said to support AVI DVD, MOV and MP4formats, but many users are experiencing problems trying to import videos to iDVD. Doremisoft Mac flip converter provides the perfect solution to importing flip video to iDVD so you can easily burn flip to DVD with iDVD. Part One: Convert flip video to iDVD compatible formats1.Add flip video Download Doremisoft flip converter and launch this application. Click the Add File button to add the flip videos that you want to burn to DVD. 2.Set output format Click the "Profile" list and find the iDVD format you prefer. 3.Edit flip video Click the "Clip" button to trim your flip video and click the Edit button to edit your flip video effects. 4.Convert flip video Click the "Start" button to start converting flip video to iDVD. Part Two: Use iDVD to burn converted flip video to DVD5.Open the iDVD application (under the Machintosh HD icon from the Applications folder). 6.Click on "Create a new project" to create a new project. Make sure to select the correct aspect ratio. Then name your project. 7.Choose a DVD menu theme for your DVD. Each template comes with an entry theme and other screens with accompanying chapters 8.Rename the title of the iDVD movie with your own tiele. 9.Under the Tabs icon, you can see the Drag Zones. Drag pictures and music into these blank boxes. You can also add music from your iTunes to your DVD menu. 10.Now, drag the converted flip videos into the movie drop zone of the selected template and you will see them to be put on the menu for the DVD. 11.And the final Step, click on Burn and iDVD will start burning your flip video DVDs. For more tutorials of iDVD, you can find some video tutorials from Apple at http://www.apple.com/ilife/tutorials/#idvd
Flip Converter for Windows Flip video Camcorder is a creative digital device produced by Pure Digital Technologies. Four series include: the Flip Ultra, the Flip Ultra HD, the Flip Video Mino, and the Flip Video Mino HD. Flip video Camcorder records video in .MP4 format, which is compatible for iTunes, iMovie, QuickTime Player. However, it is not understood by Windows Media Player and Windows Movie Maker. Is there any way to solve the problem? Doremisoft Flip Converter is an excellent flip camcorder converter to convert flip to iPhone, iPad, iPod, PSP, Apple TV etc., convert flip HD and flip video to mp4, avi, 3gp, 3g2, mpeg1, mpeg2, mpeg4, mpg, flv, swf, wmv, dv, mov, m4v, mkv etc. with easy flip video editing functions and high output quality. This flip converter is the perfect flip video software for all Flip series including Flip Ultra, Flip Ultra HD, Flip Mino, and Flip Mino HD. With this flip camcorder converter, you can even extract audio from Flip video and save the extracted audio as mp3, aac, ac3, wav, etc. Doremisoft Flip converter is also an easy flip video editing software that offers flexible yet easy functions to edit flip videos. It can crop flip video, trim flip video, adjust video brightness, contract and saturation, merge flip videos into one file and capture snapshots from flip videos.
Note: This version is for Windows™. If you are using Mac OS, please click here.
Key functions
Convert flip to all popular players:
Convert flip to to iPod touch/iPod classic/iPod nano, convert flip to iPhone, convert flip to Apple TV, convert flip to PSP, convert flip to Zune, BlackBerry, Gphone, Palm, iRiver, etc.
Convert flip video for importing to different applications:
Convert flip to Windows Movie Maker, convert flip to iMovie, convert flip to iTunes and so on.
Convert flip to mainstream video and audio formats:
Convert flip to HD video, convert flip video to MP4, convert flip to avi, convert flip video to mov, convert flip video to 3gp/3g2, convert flip video to mpeg1, mpeg2, mpeg4, flv, swf, mkv, dv, rm/rmvb, wmv, m4v and so on. And extract audio from flip video to wma, m4a, mp3, wav, aac, ac3, amr, mp2, flac, aiff, mka etc.
Support all flip camcorders:
Support all flip camcorder series including Flip Ultra, Flip Ultra HD, Flip Mino, and Flip Mino HD and always keep up with the newest flip camera updates.
Set different video and audio parameters
Allow you to select video encoder, set video resolution/frame rate/bitrate, select audio encoder, set audio sample rate/audio channel/audio bitrate to convert flip videos.
Easy yet powerful flip video editing:
Trim video length:
Capture video clips from flip video by specifying the start and end time or dragging the start slider bar and the end slider bar. You can get capture multiple clips from one flip video and insert other video clips or commercials in between.
Crop video:
Crop the screen of your video to get rid of redundant parts such as the black sides around your video and any parts that you don’t want to be on your video. You can also set video aspect ratio to fit for your player.
Edit video effect:
Edit flip video brightness, contrast and saturation, and set special video effects such as emboss, old film, gray etc.
Instant preview:
Provide two preview windows to let you preview the editing results real time.
Take flip video snapshot:
Allow you to take snapshots off flip videos and save the snapshots as JPG, PNG or BMP format so you won’t have to worry that you cannot take pictures with flip camcorders.
Batch conversion:
Load multiple flip videos and convert multiple flip videos at one time.
Merge flip videos:
Join and convert multiple separated flip videos to one single file.
Part One: How to use a Flip Video Camera?
Step 1: Before Using Flip Video Camera If you bought your Flip Video Camera from a store, make sure it is not broken. If you bought it online, before you start to take flip videos, open the box and make sure the Flip Video Camera is not broken. Step 2: Turn On Flip Video Camera Turn on your Flip Video camera by pushing the power button on the right side of the camera when lens is NOT facing you. Step 3: Record with Flip Video Camera Aim the lens of your Flip Video camera at what you want to record and press the Red button below your Flip Video screen to start recording. You can see what is being filmed through the screen. At the box around the red recording button, you will see a plus and minus symbol on the box. Press the plus symbol to zoom in when you are recording. Press the minus symbol to zoom out when you are recording. Step 4: Finish Recording with Flip Video Camera When you want to finish recording, press this red button again to finish recording. Step 5: Watch Flip Videos Watch what you have recorded by pressing the Play button on the left side of the red Recording button. Step 6: Browse Flip Videos Scroll through your recorded flip videos by pressing the left and right arrow keys at the box around the red recording button. Step 7: Transfer Flip Videos to Computer Plug your Flip Video Camera into the USB port on your computer to download your flip videos onto your computer. This will also automatically download the Flip software onto your computer. Step 8: Turn Off Flip Video Camera Turn your Flip Video camera off by pressing the power button you used to turn it on. Part Two: Flip video review, flip video comparison, flip video specsThe Flip Video Camcorder by Pure Digital Technologies has four series: Flip Mino HD, Flip Mino, Flip Ultra, and Flip Ultra HD. A lot of users may wonder what the differences between these four flip video series are. The following flip video review form covers the most important flip video specs: Part Three: Tips for Flip Video CameraMany of you might have owned flip videos for a while, but there are still some flip video tips that you don’t know yet. The following are some flip video tips we would like to share: Tip 1: Make sure you speak closer to the Flip Video when you do the shooting if you are also recording your voice. Try to shoot in not very noisy surroundings. If you do, you will have to expect your own voice to be drowned out by the noisy background. Tip 2: If you want to get a clear video of what you are shooting, try to shoot closer to the subject. You can use the Zoom function to zoom in for a better shot. Tip 3: Hold the flip video steady when you shoot your video and try to avoid jerky movements. Tip 4: When you shoot in the sunlight, make sure the light is on your back and do not face the lens to the sunlight. Having a lot of light is necessary while you are shooting, otherwise, your flip videos may look grainy and blurry. Tip 5: Although a tripod helps a lot when you want to make steady videos (for example interview videos), but when you don’t have a tripod, you can set your flip camera on a flat surface. If you have to use your hand, make sure you hold your arms close to your rips to stabilize the Flip Video. Part Four: Doremisoft Flip Video Converter---intimate friend of flip video camcorderDoremisoft Flip Video Converter is an intimate friend of Flip video Camcorder. Owning it, you can encode flip video to common video formats: AVI, MPG, MPEG, WMV, FLV, SWF, MKV, VOB, DV, 3GP, MOV, RM, RMVB and extract audio track from the referred video formats to MP3, WAV, WMA, AAC, AC3, MP2, AMR, AIFF, FLAC, M4A, MKA, and RA files. If you need to edit flip video in Windows Movie Maker, set the output profile as Raw AVI, MPEG-1, or WMV format, and then import the converted files into WMM. Like to enjoy the captured flip videos on your iPod, iPhone, Apple TV, PSP, Zune, BlackBerry, Gphone or other MP3/MP4 players? Just set the corresponding device profile.
|
 RSS Feed